
Introduction
Welcome to this 3-part technical tutorial series, where we’ll be building a Django project that enables users to manage their cryptocurrency portfolios. To implement the functionalities and additional features, we’ll be utilizing API calls to coingecko or any other cryptocurrency API.
In Part 1, we will be defining the functional requirements and give you the overview of what we are building, the approach, the high-level design and the project setup using Django. We will also configure the settings.py file, create the models and register them in the admin panel.
In Part 2, we will add the templates, views and urls and code up the entire project. This will be the most complex and detailed part of this series.
Check out part 2 HERE
In Part 3, we will wrap the series up by discussing testing approach by writing test cases for Models, Views and Templates using Pytest.
Check out part 3 HERE
The code for the entirety of the project can be found here -> Github Repo for Django Crypto App

Defining Functional Requirements
Functional requirements define what a software system or application should do to satisfy the user’s needs and business objectives. They describe the functions, features, and capabilities of the system and how it should behave under different circumstances. Let us map out the desired outcome from this project to aid us better in the development process. We will split up the app into several pieces to achieve the overall goal:
- User Authentication
The system should provide a sign-up, log-in, and log-out functionality, including password recovery features. We’ll ensure that passwords are securely stored and hashed using Django’s built-in authentication system.
- Referral System
Users should be able to invite others to join the platform using a referral link. We’ll track referral links and give the referrer a bonus when a new user signs up using their link.
- Wallet Management
Users should be able to add and remove cryptocurrencies to their wallet. For each cryptocurrency, the user can add its name, symbol, current price, and quantity to their portfolio.
- Portfolio View
Users should be able to view their portfolio in detail, which shows the value of each cryptocurrency in their wallet and the total value of their portfolio.
- Homepage
The homepage should display the 24-hour price and percentage change of the top 10 ranked cryptocurrencies, as well as the 24-hour price and percentage change of the currencies in the user’s portfolio. We’ll represent the data using a table (the table type is up to you).
- Search Bar
We’ll include a search bar that allows users to search for new cryptocurrencies to add to their portfolio.
Tech Stack
- Language: Python 3.10
- Framework: Django 4.0+
- Database: SQLite [Default]
- API USED: CoinGecko - Public Version, No API Key. Rate Limit is 10-25 req/minute
- Frontend: Bootstrap 5.1.3
- Testing: Django Test Framework
- Test Coverage: 90%+
- Development Methodology: TDD (Test Driven Development)
Planned Endpoints
Since we have the functional requirements planned out, we can now determine the URLs that we will be adding to the project. Most of these URLs will be accompanied with a template as well as a backend view.
localhost:8000/         -> [home view]
localhost:8000/login
localhost:8000/logout
localhost:8000/signup
localhost:8000/signup/str:referral_code
localhost:8000/portfolio
localhost:8000/search
localhost:8000/add_to_portfolio
localhost:8000/delete_from_portfolio/int:pk
localhost:8000/password_reset
localhost:8000/password_reset_done
localhost:8000/password_reset_confirm/<uidb64>/<token>
localhost:8000/password_reset_complete
localhost:8000/admin
Creating a New Django Project
To create a Django project for a cryptocurrency portfolio management system, follow these steps:
- Navigate to the folder where you want to create the project. Use the command
cdfollowed by the directory name to move to that folder.
cd django-crypto-app
- Create a virtual environment for your project. This is optional but recommended, as it helps keep dependencies separate from other projects on your system. Use the command
python -m venvfollowed by the name you want to give to the environment.
python -m venv env
- Activate the virtual environment by running the activation script located in the
env/Scriptsfolder.
env\Scripts\activate
- Install the packages you’ll need for your project. This includes Django for building the web application, requests for making API calls, and coverage for testing purposes. Use the
pip installcommand followed by the package name. I highly recommend using a requirements.txt file to keep track of your dependencies. Also, go to the Github Repo and check the requirements.txt file for the latest dependencies. The ones listed below are the ones used at the time of writing this article but please check the requirements.txt file for the latest dependencies and install them using the commandpip install -r requirements.txt
pip install django
pip install requests
pip install coverage
pip install django-crispy-forms
pip install crispy-bootstrap5
- Use the
django-admincommand to start a new Django project in the current folder. Add a dot at the end of the command to specify that you want to use the current folder as the project directory.
django-admin startproject crypto .
- Create a Django app named
mainappusing thestartappcommand.
python manage.py startapp mainapp
- Create database tables by running
makemigrationsfollowed bymigrate.
python manage.py makemigrations
python manage.py migrate
- Create a superuser account to access the Django admin panel. You will be prompted to enter a username, email, and password.
python manage.py createsuperuser
- Start the server using the
runservercommand.
python manage.py runserver
- Open your browser and go to
http://localhost:8000/to see the Django welcome page. - To access the admin panel, visit
http://localhost:8000/adminand log in using the superuser account you created in step 8. - Finally, generate a requirements.txt file that lists all the packages and their versions used in your project.
pip freeze > requirements.txt
These steps will create a basic Django project that can be used as a starting point for building the cryptocurrency portfolio management system.
Configuring settings.py
Here is what the project file structure looks like:-
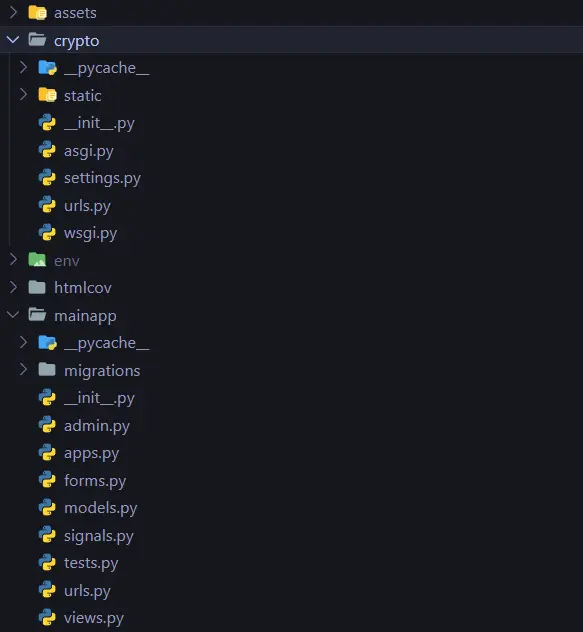
crypto - The main project folder. Contains the settings.py file and the urls.py file.
crypto\static - Contains the static files for the project such as css, js, images, etc.
templates - Contains the html templates for the project. I prefer to set up templates in the root folder and configure the TEMPLATES setting in the settings.py file to point to the templates folder.
mainapp - The main app folder.
mainapp\urls.py - Contains the urls for the main app.
mainapp\views.py - Contains the views for the main app.
mainapp\tests.py - Contains the tests for the main app.
mainapp\models.py - Contains the models for the main app such as Crypto and Portfolio.
mainapp\forms.py - Contains the forms for the main app such as CustomUserCreationForm
mainapp\migrations - Contains the migrations for the main app.
mainapp\signals.py - Contains the create_profile signal once a user is created.
In this section, we will be making some configurations to our Django project. Here are the steps to follow:
-
Open the
settings.pyfile in the main project directory. -
Change
ALLOWED_HOSTS = ["*"]to allow any host to connect to our application. -
Add our newly created custom app, mainapp, as well as the third-party packages we will be using later on by adding the following lines of code to the INSTALLED_APPS section:
"mainapp",
"crispy_forms",
"crispy_bootstrap5",
- We will be using crispy_forms and crispy_bootstrap5 for styling our forms. Therefore, we need to set the CRISPY_ALLOWED_TEMPLATE_PACKS and CRISPY_TEMPLATE_PACK variables to “bootstrap5” by adding the following lines of code:
    CRISPY_ALLOWED_TEMPLATE_PACKS = "bootstrap5"
    CRISPY_TEMPLATE_PACK = "bootstrap5"
-
Create a new folder called templates in your main project directory to store all your front-end templates.
-
Add the following code to the TEMPLATES section to specify the template directory we created:
"DIRS": ["templates"], # change this line!
- Next, we need to set up our static and media file routes. Add the following lines of code to the settings.py file:
STATIC_URL = "/static/"
STATIC_ROOT = BASE_DIR / "static"
STATICFILES_DIRS = ["crypto/static"]
MEDIA_URL = "/media/"
MEDIA_ROOT = BASE_DIR / "media"
- We will also be needing email configuration to send reset password emails to our users. Add the following lines of code to the settings.py file:
from decouple import config

EMAIL_BACKEND = 'django.core.mail.backends.smtp.EmailBackend'
EMAIL_HOST = 'smtp.gmail.com'
EMAIL_PORT = 587
EMAIL_USE_TLS = True
EMAIL_HOST_USER = config('EMAIL_HOST_USER') # load from .env file
EMAIL_HOST_PASSWORD = config('EMAIL_HOST_PASSWORD') # load from .env file
DEFAULT_FROM_EMAIL = "Crypto App <your-email-here@gmail.com>" # change this to your own email
- Finally, create a .env file in your main project directory and add the following variables to it:
EMAIL_HOST_USER=<your-email-here>
EMAIL_HOST_PASSWORD=<your-password-here>
Make sure to replace and with your own email and password respectively.
Don’t hesitate to refer to the
settings.pyfile in the Github Repository by clicking the link at the top of this tutorial.
Configuring urls.py
Since we will be using the mainapp as our main app, we need to configure the urls.py file in the main project directory to point to the mainapp. Go to the core project folder and the urls file -> crypto/urls.py and add the following lines of code:
from django.contrib import admin
from django.urls import path, include
from django.conf import settings
from django.conf.urls.static import static

urlpatterns = [
    path("admin/", admin.site.urls),
    path("", include("mainapp.urls")),
] + static(settings.MEDIA_URL, document_root=settings.MEDIA_ROOT)
Create App Models
In this code snippet, we are creating four different models for our Django web application. These models are used to define the database structure for our web application. The four models are:
- User Model: This is the default user model provided by Django’s authentication system. We are overriding this model to make the email field unique.
- Profile Model: This model is used to store additional information about the user. It has a one-to-one relationship with the User model. We are using Django’s signals to automatically create a profile for each user.
- Referral Model: This model is used to track referrals made by users. It has a foreign key relationship with the User model, and another foreign key relationship with the referrer.
- Cryptocurrency Model: This model is used to store information about cryptocurrencies. It has a foreign key relationship with the User model, allowing us to link cryptocurrencies to specific users. It stores the name, symbol, current price, and quantity of each cryptocurrency.
- Portfolio Model: This model is used to store information about a user’s portfolio. It has a foreign key relationship with the User model, allowing us to link portfolios to specific users. It stores the total value of the portfolio.
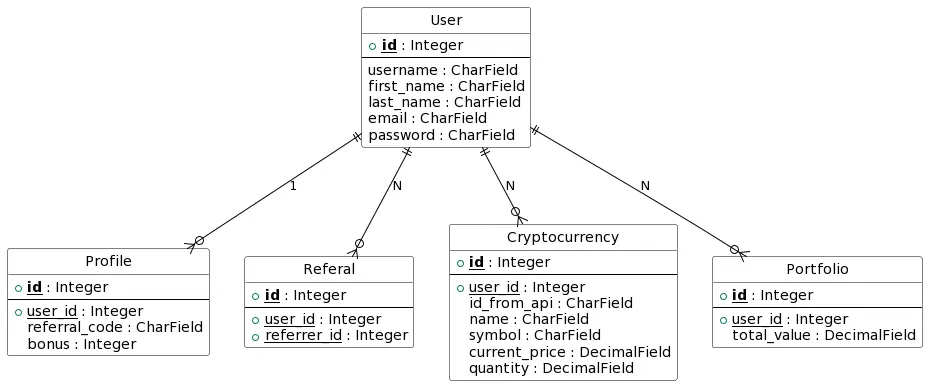
Each of these models is defined using the models.Model class provided by Django. The fields for each model are defined using various field types, such as CharField and DecimalField. We are also using various model relationships, such as ForeignKey and OneToOneField, to link our models together.
Overall, these models provide the necessary database structure for our web application, allowing us to store and manipulate data related to users, their profiles, referrals, cryptocurrencies, and portfolios.
from django.contrib.auth.models import User
from django.db import models

# Override the default User model to make the email unique
User._meta.get_field('email')._unique = True

# Make the profile for a user, automatically created when a user is created using Django signals
class Profile(models.Model):
    user = models.OneToOneField(User, on_delete=models.CASCADE)
    referral_code = models.CharField(max_length=10, unique=True)
    bonus = models.IntegerField(default=0)

    def __str__(self):
        return f'{self.user.username} profile'

# Create the referal model
class Referal(models.Model):
    user = models.ForeignKey(User, on_delete=models.CASCADE)
    referrer = models.ForeignKey(User, on_delete=models.CASCADE, related_name='referrals')

    def __str__(self):
        return f'{self.user.username} was referred by {self.referrer.username}'

# Create the Cryptocurrency model
class Cryptocurrency(models.Model):
    # here name is also the id of the cryptocurrency, so useful for API calls
    user = models.ForeignKey(User, on_delete=models.CASCADE, related_name='cryptocurrencies', null=True)
    id_from_api = models.CharField(max_length=50)
    name = models.CharField(max_length=50)
    symbol = models.CharField(max_length=10)
    current_price = models.DecimalField(max_digits=10, decimal_places=2)
    quantity = models.DecimalField(max_digits=10, decimal_places=2, default=1)

    class Meta:
        unique_together = ('user', 'name')

    def __str__(self):
        return f'{self.name} ({self.symbol})'

# Create the portfolio linked to a user and store the total value of the portfolio
class Portfolio(models.Model):
    user = models.ForeignKey(User, on_delete=models.CASCADE, related_name='portfolios')
    total_value = models.DecimalField(max_digits=15, decimal_places=2)

    def __str__(self):
        return f'{self.user.username} - Portfolio: {self.total_value}'
Registering Models in Admin
To make our models accessible from the Django admin panel, we need to register them in the admin.py file. Here’s the code that needs to be added:
from django.contrib import admin
from .models import Cryptocurrency, Portfolio, Profile, Referal

@admin.register(Referal)
class ReferalAdmin(admin.ModelAdmin):
    list_display = ('user', 'referrer')

@admin.register(Profile)
class ProfileAdmin(admin.ModelAdmin):
    list_display = ('user', 'referral_code', 'bonus')

@admin.register(Cryptocurrency)
class CryptocurrencyAdmin(admin.ModelAdmin):
    list_display = ('user', 'name', 'id_from_api', 'symbol', 'current_price', 'quantity')

@admin.register(Portfolio)
class PortfolioAdmin(admin.ModelAdmin):
    list_display = ('user', 'total_value')
In this code, we first import the models that we want to register. Then, for each model, we create a new class that inherits from admin.ModelAdmin, which allows us to customize the way the model is displayed in the admin panel. We set list_display to specify which fields we want to display for each instance of the model.
After adding this code to admin.py, we need to run migrations to update the database schema. To do this, we can run the following commands:
python manage.py makemigrations
python manage.py migrate
The first command creates a new migration file based on the changes we made to the models, while the second command applies those changes to the database. After running these commands, the models will be registered in the admin panel and we can interact with them through the dashboard interface.
Conclusion
In this technical blog post, we covered the initial steps of building a web application using Django. We started by specifying the requirements of our project and planning the project structure. Then, we determined the URLs and models we needed for our application and configured the settings.py file to ensure that our application worked properly.
Next, we created our models and defined their relationships to each other, which helped us lay out the database schema. We also registered our models in the Django admin panel, allowing us to interact with them easily via the dashboard interface.
Overall, we have successfully completed the introductory part of our project. In the next part, we will be working on views, forms, templates, and URLs to build the core functionalities of our application. This will help us to create a dynamic and responsive web application that meets our project requirements. Stay tuned for the next part!
Master Database Queries in Django with 40 Django ORM Exercises