This walkthrough guide will be hands-on, include examples, code snippets, common use cases and stick to best practices laid by Django foundation and Python.
Test your Django CRUD skills with Django Crypto App
Testing is a crucial component of Django development to guarantee the integrity and dependability of your applications. This in-depth guide will take you on a deep-dive tour of the best techniques and methods for testing Django applications. This article covers everything, from setting up the testing environment to mastering unit testing, integration testing, and end-to-end testing. Explore advanced techniques like performance and security testing, master how to write readable and maintainable tests, learn the advantages of comprehensive testing, and gain knowledge about automation and continuous testing. The knowledge and resources needed to create solid and reliable applications are provided by this practical guide, which is the best resource for any Django developer. Dive in and advance your Django development abilities! It’s a must-read, bookmark-worthy resource for newbies and seasoned developers alike.
Introduction to Testing in Django
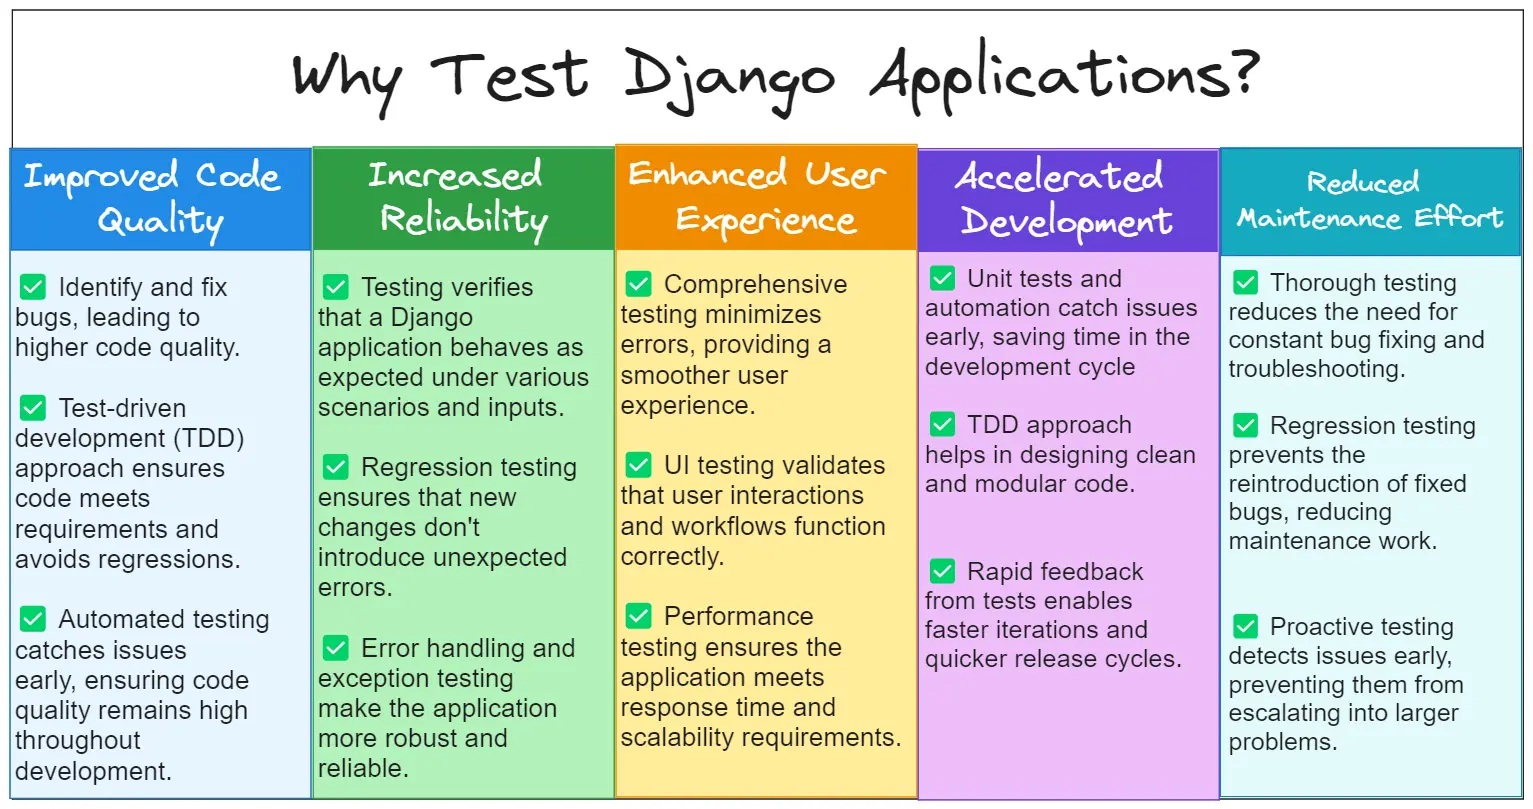
Testing plays a crucial role in ensuring the integrity and dependability of Django applications. By thoroughly testing our code, we can uncover bugs, identify issues, and verify that our application behaves as expected. In this section, we will explore why testing is essential for Django applications and the benefits of adopting a comprehensive testing approach.
Ensuring Quality and Reliability: The Significance of Testing in Django Applications
Wondering why even test applications in the first place? This will straight-up convince you!
- Quality assurance: Testing helps us identify and fix issues early in the development process, ensuring that our application meets the desired quality standards.
- Bug detection: Through testing, we can uncover bugs and errors in our code, preventing them from causing problems in a production environment.
- Code maintainability: Writing tests forces us to write modular, reusable, and well-structured code, making it easier to maintain and enhance our Django application over time.
- Confidence in changes: With a solid test suite in place, we can make changes or introduce new features with confidence, knowing that our tests will catch any regressions or unexpected behavior.
- Collaboration and documentation: Tests serve as executable documentation, helping other developers understand the intended functionality of our codebase and encouraging collaboration within the team.
Benefits of comprehensive testing
- Thorough test coverage: Comprehensive testing involves testing various aspects of our Django application, including unit testing, integration testing, and end-to-end testing. This ensures that different layers and components of our application work harmoniously together.
- Improved code quality: Writing tests forces us to think critically about the behavior of our code and the different scenarios it may encounter. This leads to cleaner, more robust code that is less prone to errors.
- Faster development process: While writing tests may initially require extra effort, it ultimately speeds up the development process. Tests act as a safety net, allowing us to catch issues early and reducing the time spent on manual testing and debugging.
- Continuous integration and deployment: A comprehensive test suite allows you to integrate automated testing into our development workflow. This enables continuous integration and deployment practices, where changes are tested automatically, ensuring the stability and reliability of our application.
💡 Remember, testing is not just a chore; it is an investment in the quality and success of your Django applications.
Set up a Minimalist Django Application
To get started with Django, follow these steps to set up a minimalist Django application:
- Install Django using
pip:
pip install django
- Create a new Django project:
django-admin startproject myproject
- Change to the project’s directory:
cd myproject
- Create a Django app within the project:
python manage.py startapp myapp
- In the project’s root directory (
myproject), you will find the following important files and folders:
manage.py: A command-line utility for interacting with the project.myproject/: The project’s package containing settings and configuration files.myproject/settings.py: Configuration settings for the Django project.myproject/urls.py: URL configuration for the project.myproject/wsgi.py: WSGI application entry point for production deployment.
- Inside the
myappdirectory, you will find files related to the app, including:
myapp/models.py: Defines the data models for your Django app.myapp/views.py: Contains the views (controller logic) for your app.myapp/urls.py: Handles URL routing for the app.
The Django project follows a specific structure, where the project’s package holds the project-level settings, and each app within the project has its own files for models, views, and URLs. Understanding this hierarchy is crucial for organizing your code effectively.
With this minimalist Django application set up, you can now start building your Django project by defining models, writing views, and configuring URLs. And most importantly, begin testing!
Setting up the Testing Environment for Your Django Applications
When it comes to developing robust and reliable Django applications, setting up a proper testing environment is essential. A well-configured testing environment allows you to effectively validate your code, catch potential bugs early on, and ensure the overall quality of your application. This will aid you in digesting the necessary steps to set up a testing environment for your Django projects.
Installing and Configuring Testing Frameworks
To begin, you need to identify a suitable testing framework that aligns with your project requirements. Let’s take a look at the steps involved in installing and configuring a testing framework like pytest.
- Install the
pytestpackage usingpip:
pip install pytest
- Create a
testsdirectory in your Django project’s root folder to store your test files:
mkdir tests
- Within the
testsdirectory, create a sample test file namedtest_example.py:
def test_example():
    assert 1 + 1 == 2
- Now, you can run the test using the
pytestcommand:
pytest
Creating a Separate Test Suite for Django Applications
To maintain a structured and manageable test suite, it is important to organize your tests into separate modules or packages. Let’s consider an example where we create a tests package and include multiple test modules within it.
- Inside the
testsdirectory, create a package namedmyapp_tests:
mkdir tests/myapp_tests
- Within the
myapp_testspackage, create a test module namedtest_models.py:
from django.test import TestCase
from myapp.models import MyModel

class MyModelTestCase(TestCase):
    def test_something(self):
        # Test your model here
        pass
- Similarly, you can create additional test modules for different components or functionalities of your Django application.
Configuring Test Databases
To ensure isolation and prevent interference with your development or production data, it is recommended to set up a separate database specifically for running tests. Here’s how you can configure the test database in your Django project.
- Open your Django project’s configuration file (
settings.py) and define a separate database for testing:
DATABASES = {
    'default': {
        'ENGINE': 'django.db.backends.postgresql',
        'NAME': 'myapp_dev',
        'USER': 'myapp_user',
        'PASSWORD': 'myapp_password',
        'HOST': 'localhost',
        'PORT': '5432',
    }, # you may be used to this
    'test': {
        'ENGINE': 'django.db.backends.postgresql',
        'NAME': 'myapp_test',
        'USER': 'myapp_user',
        'PASSWORD': 'myapp_password',
        'HOST': 'localhost',
        'PORT': '5432',
    } # but it is much better to isolate your testing database altogether. decoupling ftw!
}
- When running tests, Django automatically uses the test database. You can execute your tests as follows:
python manage.py test
This won’t really run any tests since we haven’t really written anything yet! By following these steps, you can set up a well-configured testing environment for your Django applications. This allows you to write and run tests effectively, ensuring the integrity and quality of your codebase.
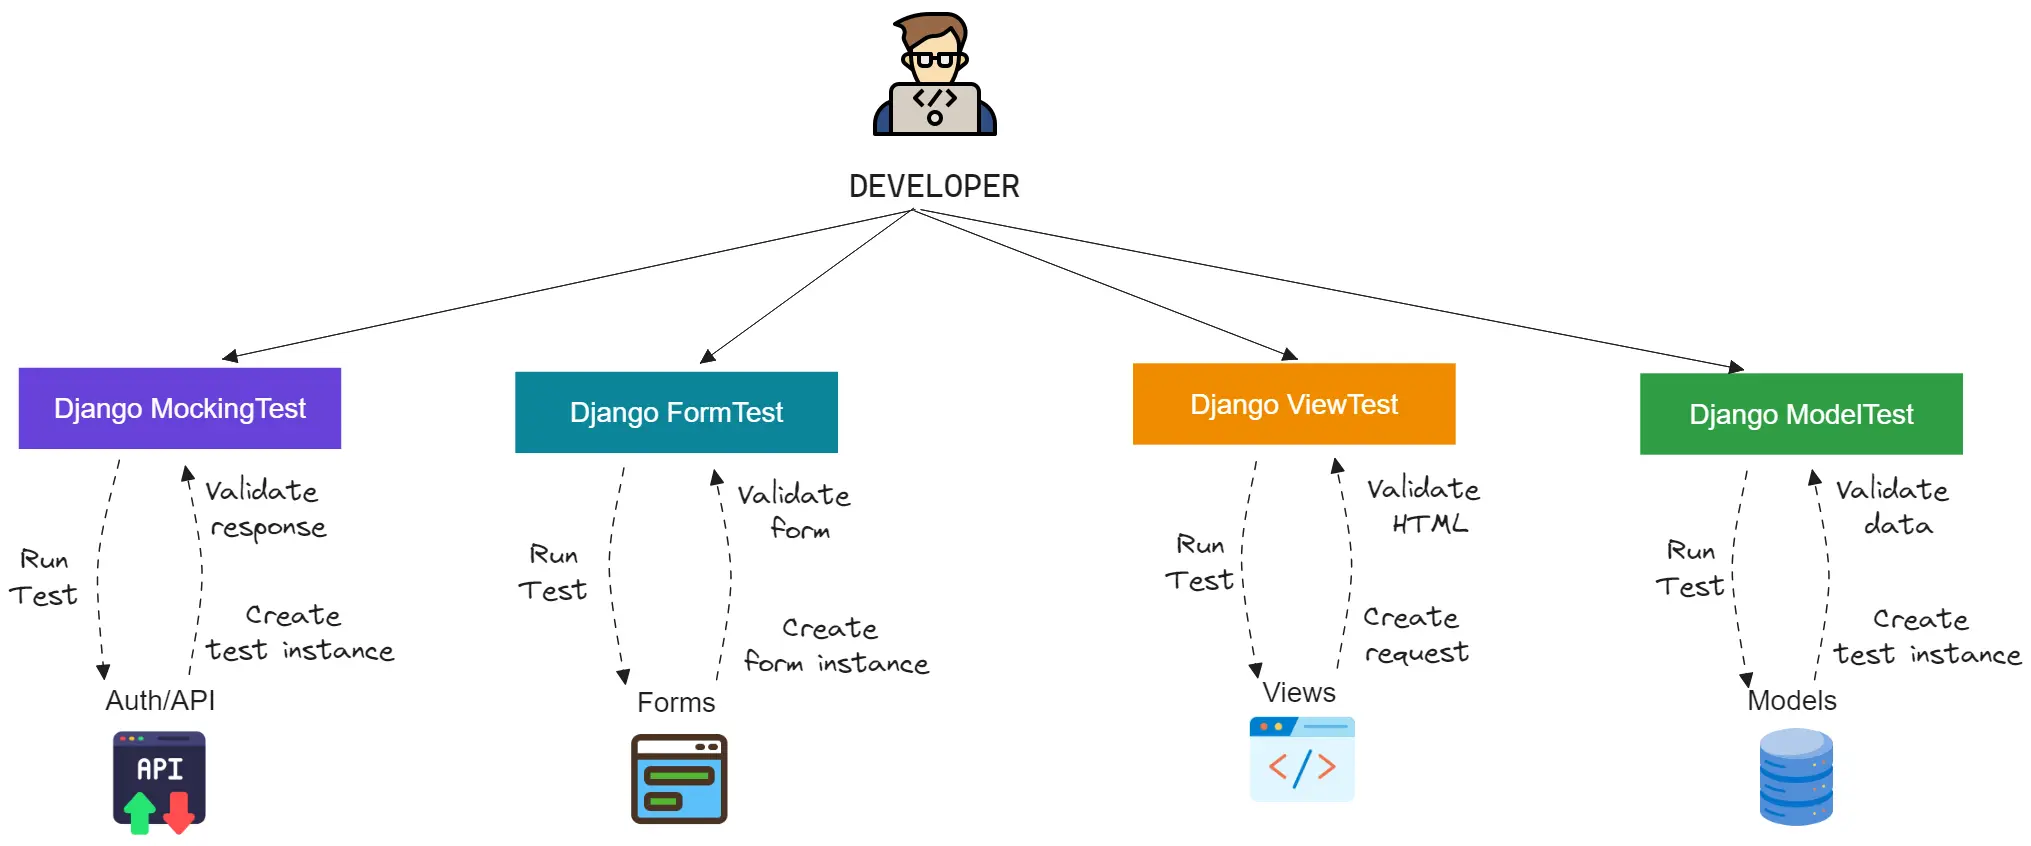
Unit Testing in Django
Unit testing plays a crucial role in ensuring the reliability and functionality of Django applications. By writing and organizing unit tests, you can validate the behavior of individual components such as models, views, and forms. Here, we will dive into how to write effective unit tests for Django models, views, and forms.
Model Testing
Model testing focuses on verifying the correctness of your Django models. It involves testing various aspects, including field validation, database interactions, and model methods. By writing model tests, you can ensure that your data models are working as expected.
To illustrate, let’s consider a minimalist example where we create a Person model:
from django.db import models

class Person(models.Model):
    first_name = models.CharField(max_length=100)
    last_name = models.CharField(max_length=100)

    def get_full_name(self):
        return f"{self.first_name} {self.last_name}"
In your unit tests for models, you can cover scenarios like validating the field lengths, testing custom model methods, and verifying the data stored in the database.
View Testing
View testing focuses on validating the behavior of your Django views. It includes testing the response status, content, and any associated business logic. By writing view tests, you can ensure that your views are rendering the correct templates, returning the expected HTTP responses, and handling input data appropriately.
Consider a minimal view example:
from django.shortcuts import render
from django.views import View

class MyView(View):
    def get(self, request):
        return render(request, 'myapp/mytemplate.html')
In your unit tests for views, you can cover scenarios like checking the rendered template, testing the response status code, and verifying the view’s behavior for different request methods.
Form Testing
Form testing focuses on validating the behavior and validation rules of your Django forms. It involves testing form submissions, field validation, and error handling. By writing form tests, you can ensure that your forms are correctly handling user input and returning appropriate error messages when necessary.
Consider a simple form example:
from django import forms

class MyForm(forms.Form):
    name = forms.CharField(max_length=100)
    email = forms.EmailField()

    def clean_name(self):
        name = self.cleaned_data.get('name')
        if name == 'admin':
            raise forms.ValidationError("Name cannot be 'admin'")
        return name
In your unit tests for forms, you can cover scenarios like validating form fields, testing form submission with valid and invalid data, and verifying the error messages.
By writing comprehensive unit tests for models, views, and forms, you can ensure the correctness and robustness of your Django application’s individual components. Django provides powerful testing tools and assertions to simplify the testing process, allowing you to write clear and maintainable tests.
Using Django’s Testing Tools and Assertions
Django provides a comprehensive set of testing tools and assertions that make it easier to write effective unit tests for your Django applications. These tools and assertions assist in setting up test cases, making assertions about the behavior of your code, and handling common testing tasks. Here are some key features of Django’s testing tools:
- TestCase Class: Django’s
TestCaseclass provides a foundation for writing test cases. It sets up a clean database for each test, provides test-specific assertions, and handles common testing operations such as running setUp() and tearDown() methods. - Test Client: The Django
Clientclass allows you to simulate HTTP requests and test the behavior of your views. You can use the client to make requests, assert response status codes and content, handle cookies and sessions, and more. - Test Database: Django automatically creates a separate test database during test runs. This ensures that your tests do not interfere with your development or production databases. You can configure the test database settings in your Django project’s configuration file.
- Test Fixtures: Test fixtures provide a way to load data into your test database before running tests. You can define fixtures in various formats (such as JSON, XML, or YAML) to populate the database with test data. This allows you to test your code against realistic data scenarios.
Django’s testing tools and assertions make it easier to write comprehensive and reliable unit tests for your Django applications. By leveraging these tools, you can effectively set up test cases, make assertions about the behavior of your code, and ensure the correctness of your application’s components.
Mocking Dependencies and External Services
In unit testing, it is often necessary to isolate your code from external dependencies and services to focus solely on the behavior of the code under test. Mocking allows you to replace these dependencies with dummy objects or simulated behaviors, enabling you to control the test environment and simulate different scenarios. Here are some techniques for mocking dependencies and external services in Django tests:
- Mocking Functions and Methods: The
unittest.mockmodule in Python provides utilities for mocking functions and methods. You can use this module to replace external function calls or method invocations with predefined return values or behaviors. - Mocking External API Calls: When your code interacts with external APIs, you can use mocking libraries like
requests-mockorhttprettyto mock the API responses. This allows you to simulate different API scenarios and ensure that your code handles the responses correctly. - Mocking Database Queries: In Django, you can use the
TestCaseclass’sassertNumQueriesandassertQuerysetEqualmethods to assert the number of database queries executed and the expected results. By controlling the database queries in your tests, you can isolate your code from database dependencies.
Mocking dependencies and external services is crucial for writing focused and reliable unit tests. By replacing dependencies with controlled mock objects or simulated behaviors, you can test your code in isolation and verify its behavior under different scenarios.
Integration Testing Techniques
Testing Django Views and Templates with Realistic Data
Integration testing allows you to test the interaction between different components of your Django application, such as views, templates, and the underlying data. By simulating real-world scenarios, you can ensure that these components work together as expected. Here are some techniques for integration testing Django views and templates:
-
Preparing Test Data: Before testing your views and templates, you should set up realistic test data. Use the Django ORM or fixture loading mechanisms to populate your test database with relevant data for the specific test scenario.
from django.test import TestCase from myapp.models import Product class MyViewTestCase(TestCase): def setUp(self): Product.objects.create(name='Product A', price=10.99) Product.objects.create(name='Product B', price=19.99) -
Simulating Requests: Use Django’s
Clientclass to simulate HTTP requests and interact with your views. You can perform GET, POST, or other types of requests and assert the response status, content, and other relevant data.coderesponse = self.client.get('/myview/') self.assertEqual(response.status_code, 200) self.assertContains(response, 'Product A') -
Testing Templates: To verify that your templates render correctly, you can use Django’s template rendering engine to render the template with the test data and then assert the expected output.
from django.template import engines

def test_my_template(self):
    template = engines['django'].from_string(
        '{% for product in products %}{{ product.name }}{% endfor %}'
    )
    rendered = template.render({'products': Product.objects.all()})
    self.assertInHTML('Product A', rendered)
    self.assertInHTML('Product B', rendered)
Integration testing views and templates ensures that the various components of your Django application work together harmoniously, producing the expected results and delivering a seamless user experience.
Interacting with Databases and Third-Party Integrations
Integration tests often involve interactions with databases and third-party integrations, such as external APIs or services. To ensure the correctness of these interactions, you can employ various techniques:
-
Managing Test Databases: Django automatically creates a separate test database during integration tests. This isolates your tests from your development or production data. Use this test database to perform queries, insert data, or validate the behavior of your code.
from django.test import TestCase from myapp.models import Product class MyIntegrationTestCase(TestCase): def test_database_interaction(self): # Perform database operations and assertions products = Product.objects.all() self.assertEqual(len(products), 2) -
Mocking External Integrations: When interacting with external APIs or services, you can mock the responses using libraries like
requests-mockorhttpretty. This allows you to simulate different API scenarios and verify that your code handles the responses correctly.import requests import requests_mock def test_external_integration(self): with requests_mock.Mocker() as mocker: mocker.get('https://api.example.com/data', text='{"key": "value"}') response = requests.get('https://api.example.com/data') self.assertEqual(response.json(), {"key": "value"})
Testing Authentication, Authorization, and Permissions
Integration tests are an excellent opportunity to validate the behavior of your authentication, authorization, and permission-related code paths. Test scenarios with different user roles and permissions to ensure that your application handles them correctly.
class MyAuthTestCase(TestCase):
    def test_authenticated_user_can_access_protected_view(self):
        # Create a test user with appropriate permissions
        user = User.objects.create_user(username='testuser', password='testpass')
        user.user_permissions.add(Permission.objects.get(codename='view_protected_view'))

        # Log in the test user
        self.client.login(username='testuser', password='testpass')

        # Access the protected view
        response = self.client.get('/protected-view/')

        # Assert that the response status code is 200 (OK)
        self.assertEqual(response.status_code, 200)

    def test_unauthenticated_user_cannot_access_protected_view(self):
        # Attempt to access the protected view without authentication
        response = self.client.get('/protected-view/')

        # Assert that the response status code is 403 (Forbidden)
        self.assertEqual(response.status_code, 403)
In the MyAuthTestCase class, we have two test methods. The first method, test_authenticated_user_can_access_protected_view, tests whether an authenticated user with the necessary permissions can access a protected view. We create a test user with the appropriate permissions, log in the user using self.client.login, and then make a request to the protected view using self.client.get. Finally, we assert that the response status code is 200, indicating a successful access.
The second method, test_unauthenticated_user_cannot_access_protected_view, tests whether an unauthenticated user is denied access to the protected view. We make a request to the protected view without logging in and assert that the response status code is 403, indicating a forbidden access.
By writing integration tests for authentication, authorization, and permissions, you can ensure that your Django application correctly handles user access based on their roles and permissions, providing a secure and controlled environment for your users.
End-to-End Testing with Selenium
End-to-end (E2E) testing is a critical aspect of software development that ensures the smooth integration and functioning of various components in a real-world scenario. In the context of Django applications, E2E testing with Selenium allows you to simulate user interactions and validate the end-to-end behavior of your application End-to-end testing is a technique that tests the complete flow of an application, simulating real user interactions from start to finish. It helps identify issues related to the integration of different components, ensuring that the application works as expected in a production-like environment.
Setting up Selenium WebDriver for Django Applications
- Install Selenium WebDriver: Use pip to install the Selenium package and the appropriate WebDriver for your browser (e.g., ChromeDriver for Google Chrome).
- Configure Selenium in Django: In your Django project’s settings, add the necessary configuration for Selenium, specifying the WebDriver’s path and other settings.
- Writing End-to-End Tests to Simulate User Interactions:
- Identify the scenarios you want to test: Determine the key user interactions or workflows that you want to cover in your E2E tests.
- Set up test fixtures and data: Prepare the necessary data and test fixtures to set up the initial state of the application for testing.
- Initialize the Selenium WebDriver: Create an instance of the WebDriver and configure any desired settings (e.g., maximizing the browser window).
- Navigate to the desired page: Use the WebDriver’s methods to navigate to the URL or page where the test scenario starts.
- Simulate user interactions: Utilize the WebDriver’s methods (e.g.,
find_element_by_*andsend_keys) to interact with the application, entering input, clicking buttons, and performing other actions. - Assert expected outcomes: Use assertions to verify that the application behaves as expected after each interaction. You can check elements’ presence, content, or other relevant attributes.
- Clean up and finalize: After completing the test scenario, perform any necessary cleanup tasks (e.g., deleting test data) and close the WebDriver.
Example End-to-End Test Case:
from django.contrib.staticfiles.testing import StaticLiveServerTestCase
from selenium.webdriver.chrome.webdriver import WebDriver

class MyE2ETestCase(StaticLiveServerTestCase):
    @classmethod
    def setUpClass(cls):
        super().setUpClass()
        cls.selenium = WebDriver()

    @classmethod
    def tearDownClass(cls):
        cls.selenium.quit()
        super().tearDownClass()

    def test_user_registration_flow(self):
        # Navigate to the registration page
        self.selenium.get(self.live_server_url + '/register')

        # Enter registration details
        self.selenium.find_element_by_id('id_username').send_keys('testuser')
        self.selenium.find_element_by_id('id_email').send_keys('test@example.com')
        self.selenium.find_element_by_id('id_password1').send_keys('testpass123')
        self.selenium.find_element_by_id('id_password2').send_keys('testpass123')
        self.selenium.find_element_by_id('register-button').click()

        # Assert successful registration message
        success_message = self.selenium.find_element_by_class_name('success-message')
        self.assertEqual(success_message.text, 'Registration successful!')

        # Simulate user login
        self.selenium.find_element_by_id('id_username').send_keys('testuser')
        self.selenium.find_element_by_id('id_password').send_keys('testpass123')
        self.selenium.find_element_by_id('login-button').click()

        # Assert user is logged in
        username_displayed = self.selenium.find_element_by_class_name('username-displayed')
        self.assertEqual(username_displayed.text, 'testuser')
Testing Strategies for Django Applications
Test-Driven Development (TDD)
Test-driven development is an approach where tests are written before the actual code implementation.
- Benefits of TDD include:
- Ensuring code correctness: By writing tests first, you define the desired behavior and then implement the code to satisfy those tests, reducing the chances of introducing bugs.
- Design improvement: TDD encourages modular and loosely coupled code, leading to better software architecture.
- Faster development: TDD helps identify issues early, allowing for faster debugging and reducing time spent on rework.
- Confidence in code changes: With comprehensive test coverage, you can refactor or add new features with confidence, knowing that your tests will catch any regressions.
Test Coverage and Measuring Code Quality
Test coverage refers to the extent to which your code is tested by your test suite.
- Benefits of test coverage and measuring code quality include:
- Identifying untested code: Test coverage analysis reveals areas of your codebase that lack appropriate tests, allowing you to fill those gaps and ensure comprehensive coverage.
- Improving code quality: By identifying code paths that are not covered by tests, you can address potential edge cases and improve the overall quality and reliability of your code.
- Guiding development efforts: Monitoring test coverage over time helps track progress and focus testing efforts on areas that require more attention.
- Encouraging best practices: Higher test coverage encourages developers to write more modular, testable, and maintainable code.
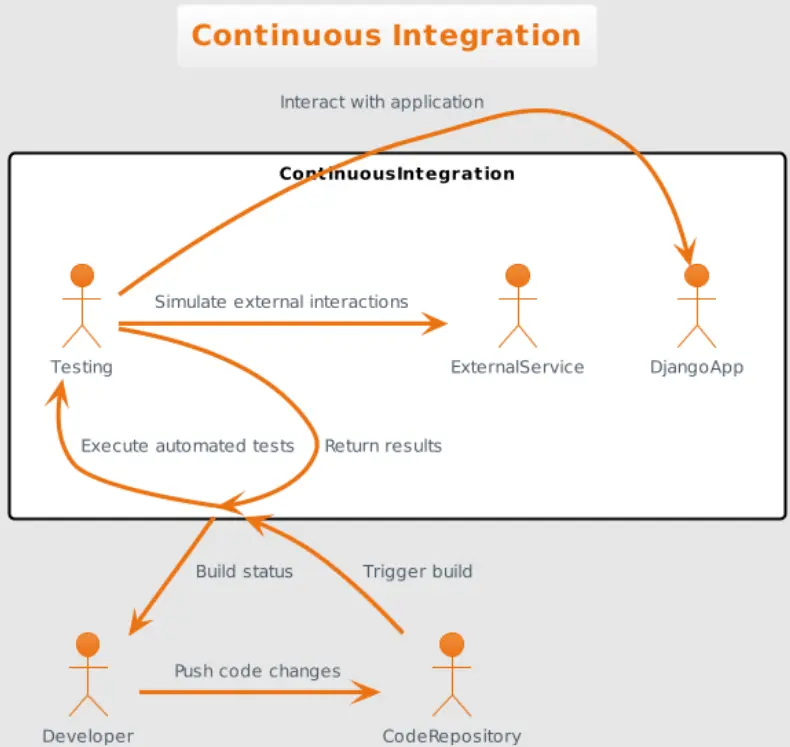
Continuous Integration and Automated Testing Pipelines
Continuous integration (CI) is a practice where code changes are frequently integrated into a shared repository, triggering automated builds and tests.
- Benefits of CI and automated testing pipelines include:
- Early feedback: CI systems provide immediate feedback on the impact of code changes, allowing developers to address issues early in the development process.
- Faster identification of regressions: Automated tests are executed on every code change, quickly detecting any regressions that might have been introduced.
- Consistent and reproducible builds: CI ensures that your application can be built and tested in a consistent environment, reducing the chances of environment-specific issues.
- Collaboration and visibility: CI systems promote collaboration by providing visibility into the status and quality of the codebase for the entire team.
By incorporating these testing strategies into your Django development workflow, you can establish a solid foundation for building robust and reliable applications. From test-driven development to measuring code coverage and implementing continuous integration, these practices enable you to deliver high-quality software while maintaining code integrity and facilitating collaboration within your development team.
Advanced Testing Techniques and Tools
To ensure the optimal performance, security, and usability of Django applications, it is essential to employ advanced testing techniques and leverage specialized tools. In this section, we will explore some of these techniques and tools that can enhance your testing efforts and help you deliver high-quality software.
Like Machine Learning with Python? Try Sales Data Analysis Walkthrough
Performance Testing Django Applications
Performance testing focuses on assessing the speed, responsiveness, scalability, and stability of your application under different loads and scenarios.
- Techniques for performance testing include:
- Load testing: Simulating high user loads to identify performance bottlenecks and determine the application’s capacity.
- Stress testing: Pushing the application to its limits by exceeding the expected load to evaluate its behavior under extreme conditions.
- Endurance testing: Assessing the application’s stability over an extended period to identify any memory leaks or resource consumption issues.
- Tools for performance testing Django applications:
- Locust: A scalable, user-friendly, and scriptable performance testing tool that allows you to define user behavior scenarios using Python code.
- Apache JMeter: A powerful and extensible Java-based tool for load testing, capable of simulating a wide range of scenarios and generating detailed reports.
Security Testing and Vulnerability Scanning
Security testing is essential to identify vulnerabilities and ensure the robustness of your application’s defenses against potential threats.
Techniques for security testing include:
- Penetration testing: Simulating attacks to identify vulnerabilities and assess the effectiveness of your application’s security measures.
- Code review: Analyzing the application’s source code to identify potential security flaws, such as injection attacks or insecure data handling.
- Security scanning: Leveraging automated tools to scan your application for common vulnerabilities and misconfigurations.
Tools for security testing and vulnerability scanning:
- OWASP ZAP: An open-source web application security scanner that helps identify common vulnerabilities and provides detailed reports.
- Bandit: A security-focused static analysis tool for Python that detects common security issues in code, such as potential vulnerabilities or insecure configurations.
Exploratory Testing and Usability Testing
Exploratory testing involves exploring the application without predefined test cases to discover potential issues or areas of improvement. Usability testing focuses on evaluating the user-friendliness and intuitiveness of your application’s interface.
Techniques for exploratory and usability testing include:
- Ad-hoc testing: Exploring the application from the user’s perspective, interacting with different features and functionalities.
- User surveys and feedback: Collecting feedback from real users to gain insights into their experience and identify areas for improvement.
Tools for exploratory and usability testing:
- Selenium WebDriver: An open-source tool for automating browser interactions, enabling you to simulate user interactions and perform usability tests.
- User testing platforms: Online platforms that facilitate usability testing by recruiting users to provide feedback and insights on your application’s usability.
By incorporating these advanced testing techniques and utilizing specialized tools, you can elevate your testing efforts to ensure optimal performance, robust security, and exceptional usability for your Django applications. Performance testing, security testing, and exploratory/usability testing collectively contribute to delivering a high-quality user experience while safeguarding your application from potential vulnerabilities.
Testing Best Practices and Tips
Writing readable and maintainable tests
Readable and maintainable tests are crucial for the long-term success of your testing efforts. Follow these best practices to ensure your tests are clear, concise, and easy to maintain:
- Use descriptive test method names: Choose meaningful names that accurately describe the purpose and expected behavior of the test.
- Structure your tests logically: Organize your tests into sections based on functionality or test scenarios to improve readability.
- Utilize comments: Add comments to explain complex test cases, highlight important details, or provide context for future maintainers.
- Keep tests focused: Each test should focus on testing a single aspect of your application, making it easier to identify and fix issues.
- Use assertions effectively: Employ meaningful assertions that clearly express the expected outcomes of your test cases.
- Avoid unnecessary duplication: Refactor common test code into reusable helper functions or fixtures to reduce duplication and improve maintainability.
Using fixtures and factories for test data
Fixtures and factories provide a convenient way to create test data for your Django application. Fixtures are pre-defined data sets used to populate your test database. Create fixtures using Django’s built-in fixtures framework or third-party libraries like Factory Boy.
# myapp/fixtures/my_fixture.json
[
  {
    "model": "myapp.MyModel",
    "fields": {
      "name": "Test Data 1",
      "value": 42
    }
  },
  {
    "model": "myapp.MyModel",
    "fields": {
      "name": "Test Data 2",
      "value": 73
    }
  }
]
Load fixtures in your tests:
from django.test import TestCase

class MyTestCase(TestCase):
    fixtures = ['my_fixture.json']
    # ...
Factories allow you to generate test data dynamically. Use libraries like Factory Boy to define factories and generate realistic data for your tests.
import factory

class MyModelFactory(factory.django.DjangoModelFactory):
    class Meta:
        model = MyModel

    name = factory.Faker('name')
    value = factory.Faker('random_int', min=0, max=100)
Handling test dependencies and avoiding test pollution
Properly managing test dependencies and avoiding test pollution are essential for reliable and isolated tests. Consider the following practices:
- Use setUp and tearDown methods: Django’s TestCase provides setUp and tearDown methods to set up and clean up test dependencies, such as creating or deleting test data.
from django.test import TestCase

class MyTestCase(TestCase):
    def setUp(self):
        # Set up test dependencies

    def tearDown(self):
        # Clean up test dependencies
- Utilize transactions: Django wraps each test in a database transaction, which is rolled back at the end of the test. This ensures that changes made during the test do not affect other tests or the production data.
- Use isolated test databases: Configure separate databases for your tests to prevent interference with development or production data.
- Avoid global state modifications: Be cautious when modifying global state during tests, as it can lead to unexpected behavior and test pollution. Reset any modified state after each test to maintain isolation.
By following these best practices and tips, you can ensure your tests are readable, maintainable, and reliable. Leveraging fixtures and factories will help you create realistic test data efficiently, while properly managing test dependencies and avoiding pollution will contribute to the stability and accuracy of your tests.
Test Automation and Continuous Testing
Integrating tests into the development workflow:
-
Integrating tests into your development workflow allows you to catch issues early, ensure code quality, and provide fast feedback to developers. Consider the following best practices:
-
Run tests locally: Developers should regularly run tests on their local machines to catch errors before committing code. Use test runners like pytest or Django’s test management commands to execute your tests locally.
- Example using pytest:
pytest -
Use pre-commit hooks: Set up pre-commit hooks to automatically run tests before committing code changes. This ensures that only passing tests are committed and reduces the chances of introducing bugs into the codebase.
- Example using pre-commit framework with pytest:
# .pre-commit-config.yaml - repo: https://github.com/pytest-dev/pytest rev: v6.2.4 hooks: - id: pytest -
Incorporate tests in code reviews: Make tests a part of the code review process to ensure that new code changes have appropriate test coverage. Reviewers can verify that new features are properly tested and encourage developers to address any missing tests.
-
Setting up continuous integration and continuous testing pipelines
Continuous integration (CI) and continuous testing (CT) pipelines automate the process of building, testing, and deploying your application. Follow these steps to set up a CI/CT pipeline using tools like GitLab CI/CD:
Configure your CI/CT pipeline: Create a .gitlab-ci.yml file in the root of your repository to define the stages and jobs for your pipeline. Specify the steps required to build, test, and deploy your Django application.
Example .gitlab-ci.yml configuration:
stages:
  - build
  - test
  - deploy

build:
  stage: build
  script:
    - echo "Building the application..."

test:
  stage: test
  script:
    - echo "Running tests..."
    - pytest

deploy:
  stage: deploy
  script:
    - echo "Deploying the application..."
Define the test environment: Specify the necessary environment and dependencies required to run your tests. This may include database configurations, environment variables, or external services.
Example .gitlab-ci.yml configuration with a PostgreSQL database:
test:
  stage: test
  image: python:3.9
  services:
    - name: postgres:latest
      alias: db
  variables:
    POSTGRES_DB: mydatabase
    POSTGRES_USER: myuser
    POSTGRES_PASSWORD: mypassword
  script:
    - pip install -r requirements.txt
    - pytest
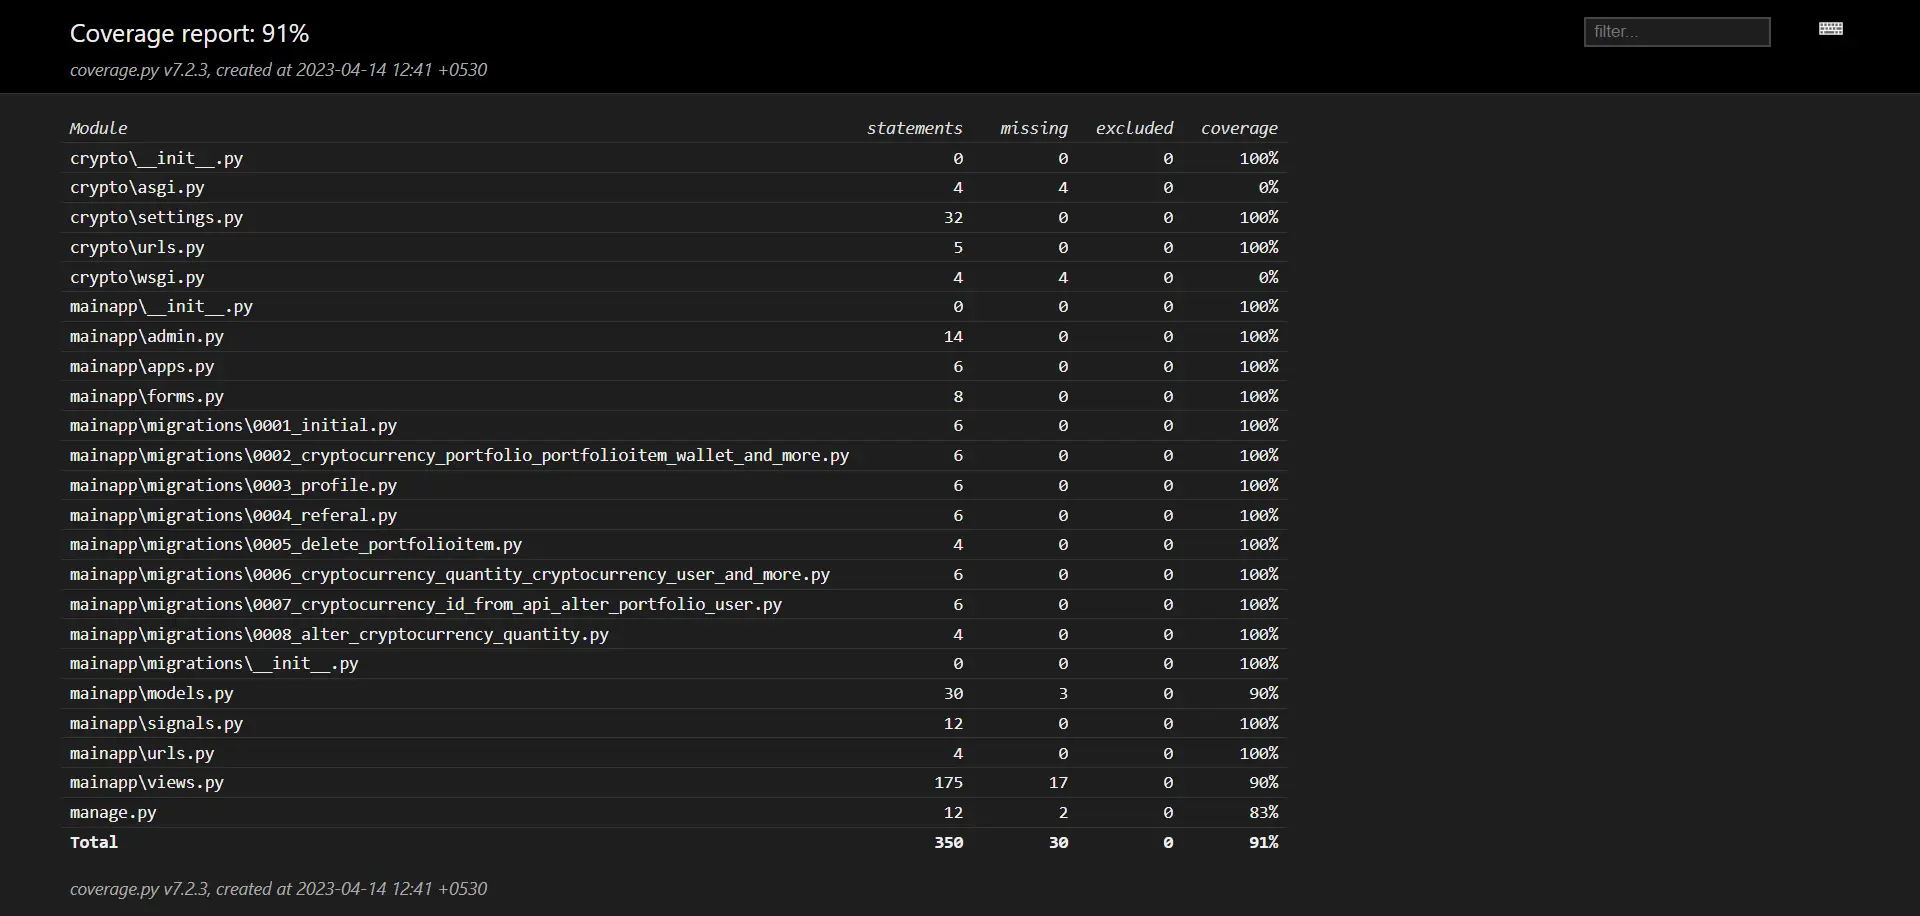
Use test coverage tools: Incorporate test coverage measurement tools like coverage.py to track the percentage of code covered by your tests. Generate coverage reports and include them in your CI/CT pipeline for visibility.
Example .gitlab-ci.yml configuration with coverage reporting:
test:
  stage: test
  image: python:3.9
  services:
    - name: postgres:latest
      alias: db
  variables:
    POSTGRES_DB: mydatabase
    POSTGRES_USER: myuser
    POSTGRES_PASSWORD: mypassword
  script:
    - pip install -r requirements.txt
    - coverage run --source=myapp manage.py test
    - coverage report
pytest: Use pytest as your test runner to benefit from its extensive features, such as test discovery, parametrization, fixtures, and plugins. Write concise and readable tests using pytest’s expressive syntax.
Example test case using pytest:
import pytest

@pytest.mark.django_db
def test_create_user():
    user = User.objects.create(username="testuser")
    assert user.username == "testuser"
coverage: Use coverage.py to measure test coverage and identify areas of your codebase that require additional testing. Generate coverage reports to assess the effectiveness of your test suite.
Example command to run tests with coverage:
coverage run --source=myapp manage.py test
GitLab CI/CD: Utilize GitLab CI/CD to automate your testing and deployment processes. Configure your .gitlab-ci.yml file to define the stages and jobs for your pipeline, enabling seamless integration with your version control system.
Example GitLab CI/CD configuration:
stages:
  - build
  - test
  - deploy

# ...
By integrating tests into your development workflow and setting up automated testing pipelines, you can ensure that your Django applications are thoroughly tested, maintain high code quality, and achieve faster and more reliable software delivery.
Conclusion
In this comprehensive guide, we have explored the world of testing Django applications, covering a wide range of topics and techniques. Let’s recap the key points we have covered:
- Why testing is crucial for Django applications, highlighting the benefits of comprehensive testing in ensuring the integrity and dependability of your applications.
- Setting up the testing environment for your Django projects, including installing and configuring testing frameworks, creating a separate test suite, and configuring test databases.
- Writing and organizing unit tests for Django models, views, and forms. We learned how to leverage Django’s testing tools and assertions, as well as how to mock dependencies and external services.
- Integration of testing techniques, focusing on testing Django views and templates with realistic data, interacting with databases and third-party integrations, and handling authentication, authorization, and permissions in integration tests.
- End-to-end testing with Selenium, discussing its importance and providing guidance on setting up Selenium WebDriver for Django applications. We also explored how to write end-to-end tests to simulate user interactions.
- Advanced testing techniques and tools, including performance testing, security testing, vulnerability scanning, exploratory testing, and usability testing. We highlighted the significance of these techniques in ensuring the robustness and reliability of your Django applications.
- Best practices for writing readable and maintainable tests, using fixtures and factories for test data, and handling test dependencies to avoid test pollution.
- Importance of test automation and continuous testing, integrating tests into the development workflow, setting up continuous integration and continuous testing pipelines, and utilizing tools like pytest, coverage, and GitLab CI/CD for automated testing.
Comprehensive testing is an integral part of Django development, providing confidence in the quality and functionality of your applications. By following the best practices and strategies outlined in this guide, you can significantly improve the reliability, maintainability, and scalability of your Django projects.
What’s Next?
Testing is a continuous journey, and there is always more to learn and explore. Here are some steps you can take to further enhance your testing skills and knowledge:
- Dive deeper into Django’s testing framework and explore its advanced features, such as testing middleware, signals, and custom test runners.
- Stay up to date with the latest testing libraries, tools, and best practices in the Django and Python communities.
- Experiment with different testing approaches and techniques, such as property-based testing, fuzz testing, or mutation testing, to uncover more corner cases and potential issues.
- Explore additional topics related to testing, such as performance optimization, load testing, API testing, or mobile testing, depending on the specific needs of your projects.
- Engage with the vibrant Django and testing communities, participate in discussions, and share your experiences and knowledge with others.
I made a intermediate level Django project based on Test Driven Development (TDD). You can check it out here. It is a crypto currency app which uses CoinGecko API to fetch the latest crypto currency prices and displays them in a table. It also has a search functionality which allows you to search for a particular crypto currency.
Remember, testing is not just about catching bugs; it’s about building reliable, maintainable, and high-quality software. Embrace the testing mindset, and let testing be an integral part of your Django development process. Happy testing!
Master Database Queries in Django with 40 Django ORM Exercises